Now something completely different: Embedded!

For some time now, we have been the owners of a small solar power plant, known in Germany as a „Balkonkraftwerk“. It is a limited version (only 800W) of its bigger brother, which means less paperwork when it comes to installation. The power output is measured with a Shelly. The data from the Shelly is then fed into an Influx database using MQTT to be displayed on a Grafana dashboard. Most of this data collection infrastructure was already in place for some other IoT devices. However, the solar system generates more interesting and changing data than, let’s say, a lamp. That’s why I came up with the idea of a real dashboard for solar energy, like the ones you sometimes see at larger solar installations. There I could always see how much energy was being produced. However, this little idea led to a longer journey that ended in embedded programming.
The journey starts
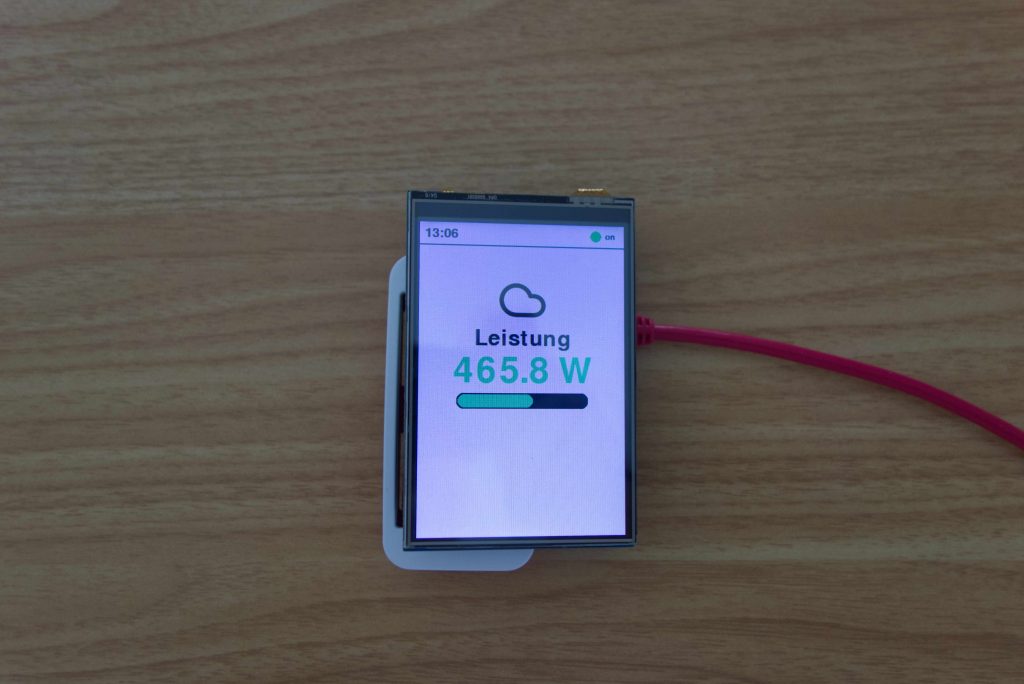
First of all, using an old PC with an old monitor would result in a setup that would consume most of the power generated by a solar plant. Just to display a few numbers that changed from time to time. Something lighter and smaller was needed. A perfect problem for a Raspberry Pi. However, they have come a long way from the $35 starting price at which they originated. There resemble a fully lightweight PC more than a small IoT computer today. But there was a Raspberry Pi offer that would fit my needs: Raspberry Pi Zero 2 W (a lighter version of the main Raspberry Pi) with a 4″ LCD Waveshare display.
At first, I thought it would be a simple configuration of a small computer that would open the Chrome browser and launch Grafana. Nothing that drastically different from the original idea. Something that could be done in 2 hours on a weekend. This was not the case. After the delivery reached my home I quickly flashed the latest version of Raspbian with Desktop onto an SD card and got to work. The first thing I noticed was the 512MB of memory. Opening and updating Chrome was the death knell for the machine. It was just too much and it froze at the first try. So I tried a few more times without much success. Then it dawned on me: the desktop solution was just too much. After a few more attempts, I changed my approach. Now just use the shell version of Raspbian, and from there I manually install the whole desktop using X-Server, and use lighter software like lxde and Midori. It was still a pain, but it worked. Now for the display.
How needs a desktop?
After a bit of soldering (the need for which had to be proven), it was time to connect. While all the parts held together, the software was became again a problem. Firstly, Waveshare’s documentation for the display was somehow out of date for the latest version of Raspbian. This meant that the „easy one click scripts“ no longer worked. So you have to do some research on all the parts you need to get a display to show stuff. Meanwhile, the weekend is over. Also, the sunken (time) cost fallacy began to set in. Why stop after all this time? But the whole project was put on hold.
A few weekends later, my attention was drawn to the project again. After some time I found out about dtoverlays in linux out, which provide the necessary configuration to get a working framebuffer. (Helpful links are here and here)
But the X-Server still would not use the newly framebuffer for displaying the Desktop. So after many more trail and error and changing many different configuration files, I gave up and switched the approach again. Now, just use the framebuffer directly. There was a very good StackOverflow Post that informed me of the possibility of using Pygame. With a longer background in Python, this was ideal. So I coded a small application that would make a request to the Shelly to get the data and then display it on the screen. And it worked really well for a while. It was everything I wanted! I even tried using the touch input as described in the StackOverflow post, with mild success. In the end, a small display was created that showed the watts of the solar system, using only 1.2 watts itself. But that was not the end of the story.
Let introduce me: Raspberry Pico WH
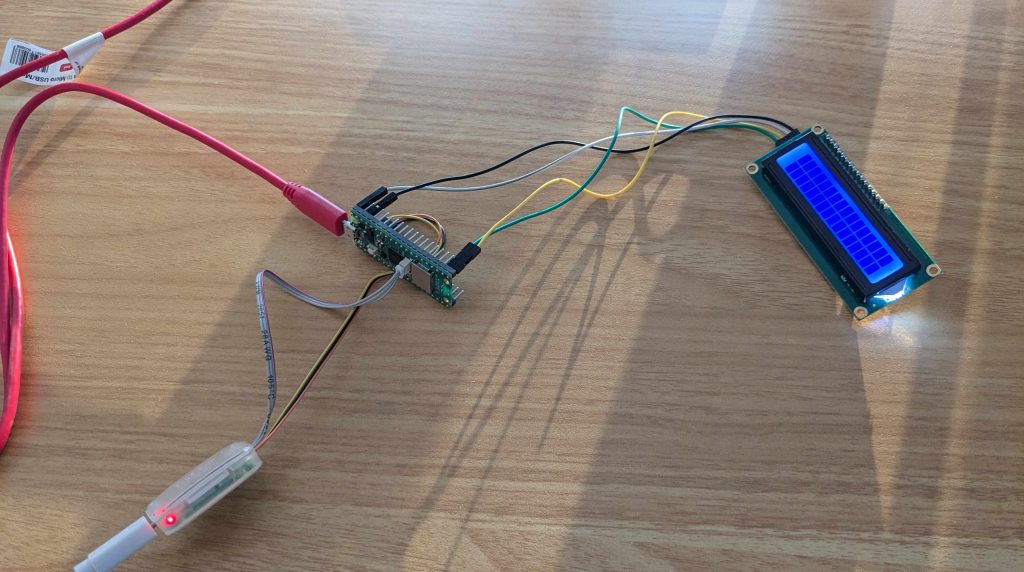
On one day I stumbled across the Raspberry Pi Pico in the same online shop where I bought the Raspberry Pi Zero 2 W, and it looked interesting. This is not a computer at all, just a microprocessor board. No operating system, just the processor and your code. The RAM is 128KB and the processor clock is 125MHz, the likes of which have not been seen in consumer devices for three decades. At the same time, power consumption and price are drastically reduced. 5 dollars, no more. Also, it can be programmed using Micropython, a special implementation of python for microcontrollers. To be more precise, I stumbled across a beginner’s kit with some parts in it. As I had got a taste of bare-metal programming during my trip with Solar Display, so I ordered one and started experimenting. I built small projects, such as a timer that could be configured via a web page hosted by a web server in the Pico Access Point’s wifi. But it looked like a completely different story for some time.
A good start
And I was pleasantly impressed. The simple, no-frills nature of embedded has something unique that is lost in today’s world of meta-frameworks for edge runtimes. Of course, you don’t want to start a SaaS e-commerce startup with it, but embedded is about using computing technology in a focused way that is deeply connected to the underlying problem you’re trying to solve. It depends on the problem, of course, but some problems can be solved with a simple display and a microcontroller.
So, with the joy of the first hour, I returned to my solar display. I used an LCD 1602 from the beginner’s kit, connected to the Pico via I2C. This made it possible to use the basic structure of the code from the RPi Zero 2 W. No Pygame or other libraries of course, but the layer was not necessary. This time, even after an afternoon with a paper box, a prototype was ready. Maybe it could be battery powered to avoid the whole mountain of cables and make it more flexible. But for now, a power bank should do.
Optimization
You may be wondering how a power bank makes sense? Most power banks will not work with embedded devices as they draw too little power. However, the current Pico was an unintentional power hungry monster. To my utter amazement, the 5000mAh was empty after 10 hours from a device that should only need 80mAh at peak. How was this possible? So the search for the culprit began? Is something broken, the calculation wrong or the code so unoptimised? In the end, the last two points were correct.
Firstly, it turned out that the power bank was not operating at peak capacity. It turned out that the 15 years had already taken their toll. But it wasn’t fully charged either. The power bank has four bars that indicate how much power it contains. However, after a little test with a Shelly, it turned out that the fourth and last bar appeared to be at 50%. In the original test, I assumed it was almost fully charged, which was not the case.
HTTP?
But the code wasn’t golden either. The longer the device is in (hardware) sleep, the better. And this is where it did not pay off that it was a direct port. Most of the time it should have stayed asleep and only run the code in the main loop after a hardware timer that runs every 2 seconds was triggered. But an HTTP request was made to update the display, which takes 150ms – 900ms. The Micropython urequest library is not really optimised for this either. After briefly implementing the sockets by myself, I was able to eliminate the upper outlier and arrive at a maximum of 400ms.
But the whole HTTP request thing is out of place. There are better ways. This is where the MQTT infrastructure that was already available for Grafana came in handy. MQTT makes much more sense than a complex HTTP request every time. So the whole implementation was rewritten in MQTT and suddenly it was only 3ms for each request. The only thing lost was the update rate. This was controlled by the Shelly device. In retrospect, the whole story is all the funnier because the original idea already used the MQTT infrastructure via Grafana. Somehow I got lost during the quick and dirty first versions of the Pygame implementation.
Writing to the display was also a drain on power and time, but this was reduced to 40ms with more clever display updates. All in all, enough tweaking was done to get the adapter to refuse to accept the device as a user, reducing power consumption by a factor of 3.
The C-language
Yes, I haven’t reached the end yet. Anyone who has ever worked with embedded will be surprised by Micropython, and rightly so. An interpreted language on limited hardware is not often found. Fortunately, the Raspberry Pi Pico C SDK is relatively well documented and has a large community that is not too technically fragmented on many different devices. Only with the Pico 2 will another range of systems be added. The Pico has also been on the market for a few years now, so official debugging probes and helpful support tools have found their way onto the market.
But C remains no small undertaking, especially with limited experience. I only considered this step after the core structure had been written. Unnecessary functions were also removed. (Functions like the weather forecast, another old relic from the Rapsberry Pi Zero). Once the structure was simplified, I started. I had experimented with C a few times before, but this was also my first real project.
The plan
There were three main hurdles to the project.
1. establishing a WLAN connection
2. connect to the MQTT server and listen to incoming messages
3. displaying the MQTT messages value on the LCD display.
Items one and two could be solved relatively easily using documentation and examples. The official examples from Raspberry refer to the lwIP project, a lightweight implementation of the TCP/IP protocol, which fortunately also supports MQTT as an application of the stack. I had feared that the MQTT implementation would have to be solved independently of lwIP, e.g. with Paho-MQTT, but this turned out not to be the case.
The implementation of the LCD display could also be taken from the previous project, but also to a large extent from the Pico documentation. The next step was to link all the components together and the C version was ready.
What was the performance gain? About a factor of 7. In reality, both applications run more or less at the same speed. However, the CPU frequency has been reduced from 125Mhz to 18Mhz.
So where did I end up? From the overkill of the Chrome Grafana microcontroller setup, which displays data to an LCD display without an operating system.

Summary
So what can you take away from this? This blog post is more of an experience report than a tutorial. It is meant to be a prelude and more or less an explanation of how I found my way to embedded. To be honest, embedded is the clear opposite of the web and AI world I usually describe in the blog. But both are just tools, even if the former has already strayed a bit from that path. And sometimes the old toolbox is enough to solve the problems.
Also, as I went along, the limitations become stronger in a natural way. If I jumped straight into embedded, I could be put off by all the hardware and software limitations.
But at the same time it is a different way of programming. A bit more bare metal. How I ended up, it tried to describe using this block post.
Schreibe einen Kommentar